목표
- GitHub에 Gradle Project를 업로드하고, Jenkins와 연동한다.
- Pipeline을 이용해 SonarQube를 연동한다.
- Pipeline을 이용해 JUnit을 연동한다.
목차
- Pipeline Item 생성
- Jenkins와 Git 연동
- Pipeline을 이용한 Jenkins와 JUnit 연동
- Pipeline을 이용한 Jenkins와 SonarQube 연동
1. Pipeline Item 생성
일단 Pipeline 플러그인을 설치해야 한다.
Jenkins 관리 - 플러그인 관리 - 설치 가능에서 pipeline을 검색하고 설치해준다.
(이미 설치된 경우 설치된 플러그인 목록에서 볼 수 있다.)

이제 Pipeline Item을 생성해서 Git과 연동시키는 일부터 해보겠다.
Jenkins 새로운 Item - Pipeline 선택 및 item 이름 입력

2. Jenkins와 Git 연동
만들어진 item에서 구성을 누르면 설정을 바꿀 수 있다.
Pipeline에서 다음 샘플 코드를 입력한다.
프로젝트/src/main/java/test.sh 파일이 생성된 상태여야 한다.
테스트용으로 작성한 코드라 경로나 파일을 바꿔도 상관없다.
node {
    def hello = 'Hello yeonlog' // 변수 선언
    stage('clone') {
        git '깃허브 주소'
    }

	stage('print') {
        print(hello) // 함수 및 변수 사용
    }

    dir('src/main/java') { // 프로젝트 내의 폴더에서
        stage ('test script')
        sh './test.sh'
    }
}

void print(message) { // 함수 선언
    echo "${message}"
}
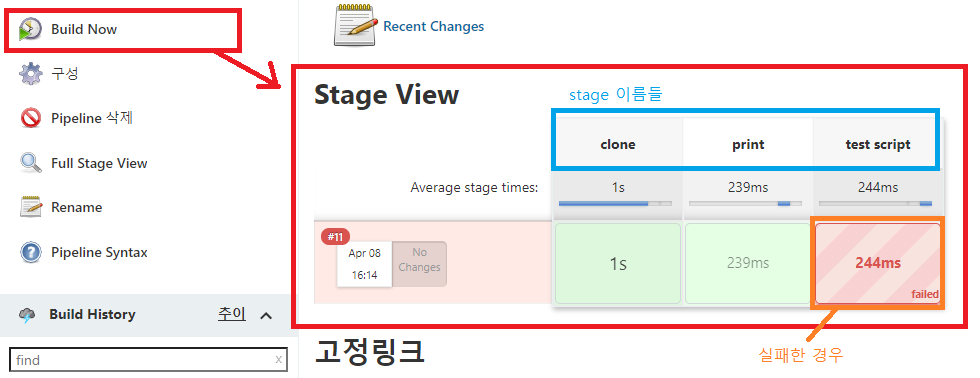
생성 후에 Build Now를 누르면 Stage View에서 결과가 뜬다.
연두색(성공)과 빨간색(실패) 칸에 마우스를 올리면 자세한 로그를 확인할 수 있다.
2-1. java.io.IOException: Cannot run program "nohup" (in directory "~"): CreateProcess error=2, The system cannot find the file specified 에러
- Windows에서 일부 명령어를 지원하지 않기 때문에 생긴 오류 같다.
-> 방법1: sh 대신 bat 사용
-> 방법2: git bash 이용 (참조의 오류 2-1 참고)
2-2. 중간까지만 실행되고 뒤의 stage들은 실행되지 않는 경우
- 기본적으로 Pipeline은 순서대로 실행한다.
- 만약 clone에서 에러가 날 경우, 뒤에 있는 print와 test script는 실행하지 않는다.
-> 앞에서 에러가 나도 뒤의 stage들을 계속 실행하고 싶다면 try - catch 구문을 사용하면 된다.
node {
    def msg = 'failed'
    dir('src/main/java') {
        stage ('test script')
        try {
            sh './test.sh'
        } catch (e) {
            print(msg)
        }
    }
}

void print(message) { // 함수 선언
    echo "${message}"
}
위 예제 스크립트에서는 Scripted 방식을 사용했다.
하지만 JUnit을 연동하는 부분부터는 Declarative 방법으로 전환해서 사용하겠다.
(Scripted는 인터넷에 예제코드가 별로 없고 공식 문서 마저도 Declarative 위주로 작성되어 있기 때문에..ㅠㅠ)
Jenkins 문법의 종류에 대해서 ▼
Jenkins Pipeline은 Scripted와 Declarative 두 가지 문법을 지원하는데, 이 문법은 서로 호환되지 않으므로 둘 중 하나만 사용해야 한다.
Scripted는 Groovy로 빌드되기 때문에 훨씬 유연하고,
Declarative는 훨씬 간단하게 작성할 수 있다.
단순한 배포 작업을 반복할 뿐이라면 Declarative를, 좀더 복잡하고 까다로운 요구사항을 가진 작업을 해야한다면 Scripted를 사용한다.
Scripted
- Groovy로 빌드됨. 훨씬 유연.
- 프로그램 작성과 유사
- 필요한 경우 커스텀한 작업 생성이 가능
- 일반적으로 더 많은 프로그래밍이 필요
- 전통적인 Jenkins 모델과 맞지는 않음
- www.jenkins.io/doc/book/pipeline/syntax/#scripted-pipeline
3. Pipeline을 이용한 JUnit 연동
기본적으로 JUnit 플러그인은 설치했다는 가정 하에 포스팅한다.
(Jenkins 관리 - 플러그인 관리 - JUnit 검색 후 설치)
2에서 작성했던 pipeline script를 변경하자.
checkout, build, junit test 3단계로 구성했으며 스크립트 작성 팁은 아래 첨부하겠다.
pipeline
{
    agent any

    tools {
        gradle 'gradle'
    }

    stages
    {
        stage ('Checkout')
        {
            steps {
                git credentialsId: 'yeon-06', url: '깃주소'
            }
        }
        stage ('Build')
        {
            steps {
                bat "./gradlew.bat build"
            }
        }
        stage('JUnit Test'){
            steps{
                junit '**/build/test-results/test/*.xml'
            }
        }
    }
}
스크립트 작성 팁 ▼
pipeline script 작성하는 부분 아래를 보면 Pipeline Syntax가 존재한다.
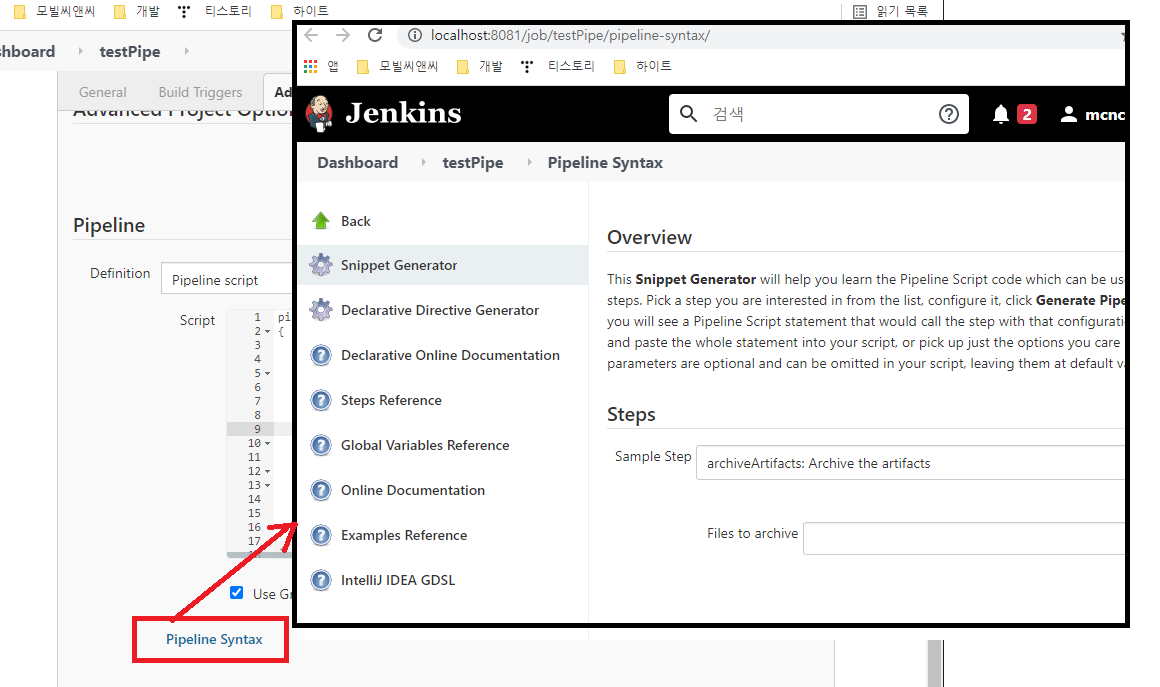
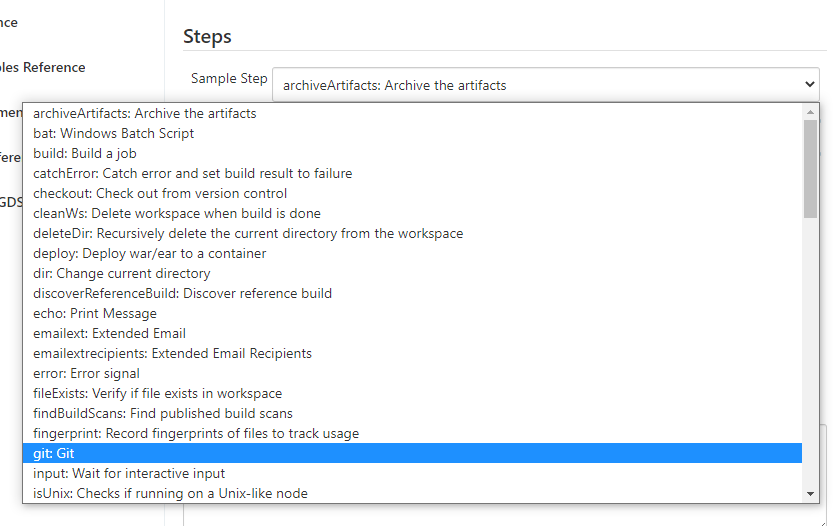
Sample Step 목록을 펼쳐보면 다양한 작업들이 존재한다.
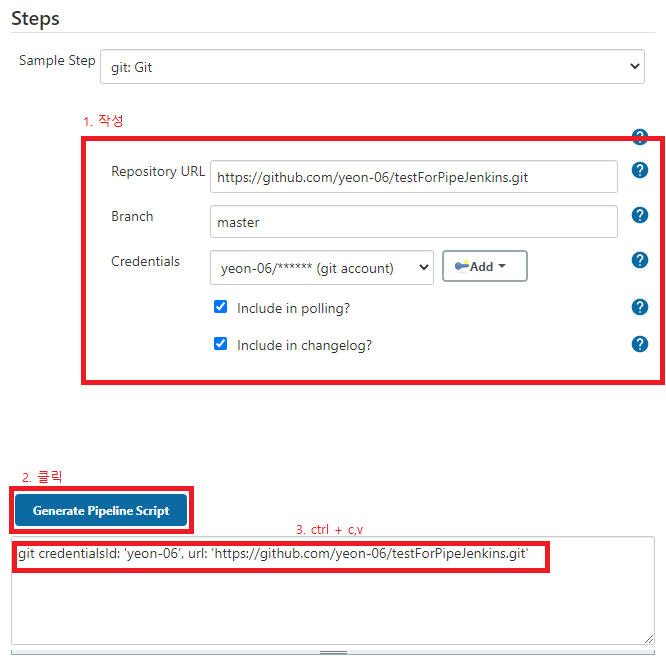
예시로 Git과 연동하는 코드를 작성해보겠다.
필요한 정보를 작성하고 Generate Pipeline Script 버튼을 클릭하면 스크립트 코드를 알아서 출력해준다.
이 부분을 복사해서 pipeline script 안에 붙여넣기 하면 된다.
3-1. Execution failed for task ':compileJava'.
-> Java의 경로가 jre로 설정되어 있었다. jdk 내에 존재하는 tools.jar을 이용해야 하므로 경로를 jdk로 재설정할 것.
3-2. ERROR: No test report files were found.
-> test report의 위치 잘 확인하고 입력할 것.
- gradle 3.0 이전에는 '**/build/test-results/*.xml' 위치에 있었다고 한다.
4. Pipeline을 이용한 Jenkins와 SonarQube 연동
기본적으로 SonarQube, SonarQube Scanner, Jenkins의 SonarQube 플러그인은 설치했다는 가정 하에 포스팅한다.
아래 포스팅의 2번까지 따라한 뒤 본 포스팅으로 돌아오면 된다.
설치 및 설정: yeonyeon.tistory.com/83
현재 스크립트는 아래와 같은 상태이다.
pipeline
{
    agent any
    tools {
        gradle 'gradle'
    }
    stages
    {
        ...
        stage('sonarqube') {
            steps {
                withSonarQubeEnv(credentialsId: 'sonarPipe', installationName:'SonarQube') {

                }
            }
        }
        ...
    }
}
- credentialsId: sonarqube의 token을 등록한 jenkins credential의 Id
- installationName: Jenkins 관리 - 시스템 관리 - Sonarqube Servers에 등록한 Name
sonarqube에서 프로젝트를 생성하면 아래와 같은 화면이 떴을 것이다.
각각의 스크립트를 build.gradle, pipeline script에 추가하면 된다.

참고로 Gradle에서 plugins { id "..." }와 apply plugin "..."는 같은 의미로 사용된다.
plugin을 추가할 일이 많거나 특정 버전으로 관리하고 싶을 경우 등을 고려하면 plugins { ... } 사용을 권장한다.
sonar.projectKey와 같은 SonarQube의 설정들은 두 가지 방법으로 관리 가능하다.
- 프로젝트의 gradle-wrapper.properties 파일 수정
- Jenkins의 pipeline script 추가
token과 같은 Git에 공유되면 곤란한 설정이나, 설정을 온전히 Jenkins에서만 관리하고 싶다면 2와 같이 사용하면 된다.
1 예제 (gradle-wrapper.properties)
...
systemProp.sonar.host.url=http://localhost:9000
systemProp.sonar.projectKey=test
systemProp.sonar.projectName=test
systemProp.sonar.sourceEncoding=UTF-8
systemProp.sonar.sources=src
2 예제 (Jenkins pipeline script)
...
        stage('sonarqube') {
            steps {
                withSonarQubeEnv(credentialsId: 'sonarPipe', installationName:'SonarQube') {
                    bat './gradlew.bat sonarqube -Dsonar.login=token코드'
                }
            }
        }
...
4-1. ERROR: SonarQube installation defined in this job (My SonarQube Server) does not match any configured installation
- withSonarQubeEnv()에서 잘못된 installationName 입력
-> Jenkins 관리 - 시스템 설정 - SonarQube Server 이름 확인 후 입력
4-2. java.lang.IllegalStateException: Unable to find credential with id '~'
- withSonarQubeEnv()에서 잘못된 credentialsId 입력
-> SonarQube server에서 설정했던 token 값의 credentials Id 입력
5. 결과

JUnit 성공/실패 여부를 해당 프로젝트 화면에서 볼 수 있다.

빌드 결과의 오른쪽에 SonarQube 아이콘을 이용해 SonarQube 결과를 확인할 수 있다.
참조
pipeline item 생성 jojoldu.tistory.com/356
'Develop > etc' 카테고리의 다른 글
| [Redmine] Eclipse에서 Redmine 활용하기 (0) | 2021.04.29 |
|---|---|
| [Redmine] 설치부터 Eclipse 연동까지 (0) | 2021.04.28 |
| [Jenkins] PipeLine Syntax (0) | 2021.04.19 |
| [Gradle] gradle이란? (0) | 2021.04.16 |
| [Jenkins] JUnit과 연동 (0) | 2021.04.06 |


